
If you’re a homeowner, chances are that at some point, you will have to connect copper pipe to cross-linked polyethylene (PEX) pipe. It’s a common repair that plumbers are called to do, and it’s not as difficult as it might seem.
In this article, we’ll show you how to connect copper pipe to PEX pipe, so you can do this part of plumbing yourself.
Tools You’ll Need To Connect Copper to PEX Pipe
- Push-In Fitting
- Wire Brush
- Pipe Cutter
If Using Solder-On Fittings:
- Blowtorch
- Flux
- Solder
- Crimp Rings/Cinch Clamps
- Crimping Tool/Clamp Cinch Tool
Step By Step Guide: How To Connect Copper to PEX Pipe
Step1 – Decide Which Method You’re Going to Use
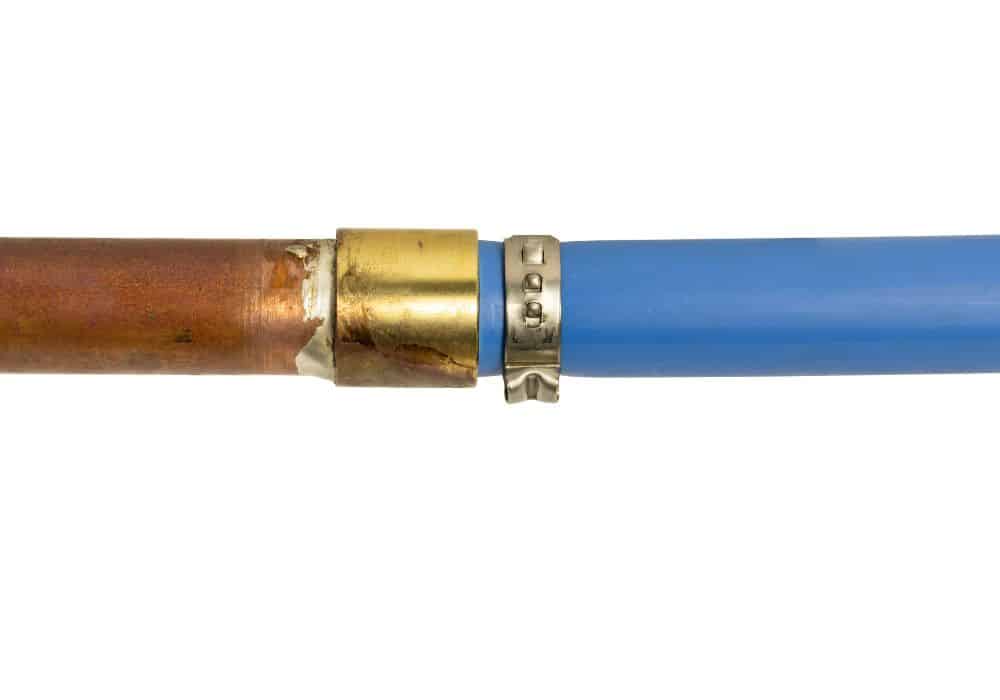
There are two main methods of connecting copper pipe to PEX tubing. The first one utilizes solder-on copper to PEX adapters and crimp rings or cinch clamps to fortify the connection.
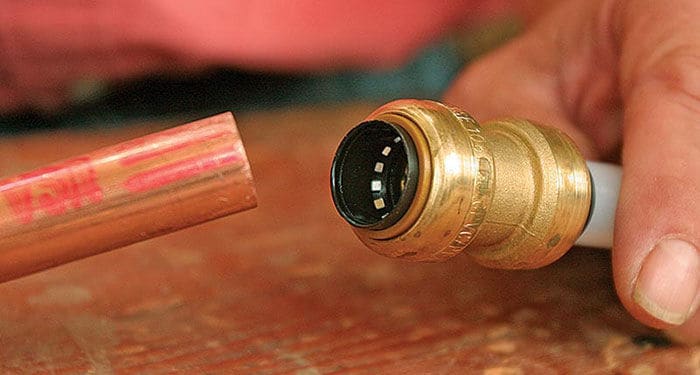
The other method is relatively new and uses push-in fittings. It’s the easiest type of fitting to use, and it doesn’t require any soldering or special tools and you can usually connect them in a matter of seconds.
The downside to push-in fittings is that they’re not as strong as soldered connections, and they’re not recommended for use in high-pressure applications.
We recommend using push-in fittings for new DIY-ers that aren’t familiar with soldering, and more traditional solder-on fittings for more experienced people that already have the required tools for that.
If you’re not sure which method to use, we recommend starting with the push-in fittings or even calling a professional plumber.
Step2 – Cut and Prepare the Pipes
Before you connect copper pipe to PEX pipe, you need to cut the pipes into required lengths. Use a measuring tape to measure the pipes and mark the cutting line with a marker, pencil, or chalk.
We recommend using a simple tubing cutter for copper pipes, and a PEX pipe cutter for PEX pipes. There’s no need to use power tools for these pipes because both, PEX and copper are relatively soft materials that can be easily cut.
When using a tubing cutter, position the cutting wheel at the cutting line on the pipe, and tighten the tool so it’s snug around the pipe. Then, start rotating the tool around the pipe, continuously tightening it as you rotate.
When using a PEX pipe cutter, make sure to cut the pipe at a 90-degree angle. This will help to create a tight seal when you connect the pipe to the fitting. If you don’t cut it straight down, but at an angle, the connection will be loose, and it might leak over time.
Step3 – Prepare the Copper Pipe
Once you’ve cut the copper pipe, you’ll need to prepare it for soldering. To do this, you’ll need to clean the inside and outside of the pipe with a wire brush. This will remove any dirt or debris that could prevent the solder from adhering to the pipe.
If the cut isn’t particularly clean, you can deburr the pipe using sandpaper or deburring tool. It will get rid of all jagged edges, guaranteeing a solid connection. If you’re using sandpaper, you can wrap it around a block of wood for easier handling.
As with sanding all things, start with lower-grit sandpaper, and move to a higher (finer) grit sandpaper as you go. It will result in the best deburring and smooth finish.
Step4 – Connect The Copper Pipe To The Fitting
Once the pipe is prepared, you can connect it to the fitting of your choice. If you’re using a solder-on adapter, you have to solder it to the pipe.
To do this, you’ll need a soldering torch, flux, and solder. To begin, apply the flux to the inside of the solder-on adapter, and on the outside of the pipe. This will help the solder adhere to the pipe.
If you don’t use the flux, the solder will not bind to the pipe and fitting, and your connection will be weak and prone to leaks.
Now, insert the end of the copper pipe into the fitting, and start soldering by heating up the connection. Then, put on the solder on the connection, continue to heat it until the solder has melted, and connected the copper pipe with the fitting.
Finally, allow the joint to cool for a few minutes before connecting the PEX pipe.
If you’re using a push-in fitting, the process is much simpler. This type of fitting is also called push-to-connect fitting, or simply push fitting, and is almost exclusively made of brass. First, push the copper pipe into the fitting all the way until you feel that it’s connected.
The connection should be tight and secure, but if it’s not, you can always remove it and push it in again. If the connection is still not tight enough, you can add a small amount of pipe sealant to the end of the copper pipe, and slide it in again.
Then, depending on what exact push-in fitting you have, you might need to insert a PEX stiffener into the end of the PEX pipe. Finally, push-in the PEX pipe into the other side of the fitting, and here you go, you have connected the copper pipe to the PEX pipe!
Here’s a quick video showing how to use push-in fittings.
Step5 – Secure The PEX Connection (Optional)
If you used the solder-on adapter, you have to secure the PEX connection with either crimp rings or cinch clamps. Both of these options require specialized tools – a clamping tool for cinch clamps, and a PEX crimp tool for crimp rings.
Both options do the job just fine, but there are a few differences between them. Cinch clamps are more expensive (including the rings themselves and the tool to fit them), but the installation is much easier, especially in tight spaces, and the clamp cinch tool is more versatile than the ring crimper.
It’s because the clamp cinch tool is universal to all sizes of all PEX pipes, while the crimp ring tool is sold in a variety of sizes, depending on what sized pipe you’re going to fit. So, if you have multiple sizes of PEX pipe, you’ll need to purchase a set of crimp ring tools that can accommodate all sizes.
It quickly adds up to the total price, and while there are some universal options around, they are rather expensive.
The procedure of securing a watertight seal at the connection is almost the exact same with both, crimp rings and cinch clamps. Put on the ring or clamp on the PEX pipe where it joins the fitting, and tighten it with the tool.
Step6 – Check for Leaks
Regardless of which fitting type you’ve used, it’s important to check for leaks after you’ve connected the pipes. For example, if you’ve attached the new PEX pipe to a copper pipe that’s leading into a valve connected to your toilets, showers, or sink, you could suffer from significant damage if the connection leaks.
The best way to check for leaks is to turn on the water supply and check for leaks at the connecting joints. If you see any leaks, you’ll need to disconnect the pipe and fittings and start over.
Extended Tips
- When using solder-on fittings, it’s important to use lead-free solder. Lead-based solder is no longer allowed to be used in potable water applications.
- Before connecting the PEX pipe to the solder-on adapter, solder the copper tube onto the fitting. This will prevent the PEX pipe from melting if you’d do it the other way around.
- When using crimp rings or cinch clamps, make sure that they’re properly secured. A loose connection can lead to leaks.
- When using push-in fittings, it’s important to follow the manufacturer’s instructions. Some brands of push-in fittings require that you use a special tool to secure the fitting to the pipe.
- Always turn off the water before you start working on the pipes.
- If you’re not sure which method to use, or if you’re having trouble connecting the pipes, we recommend calling a professional plumber.
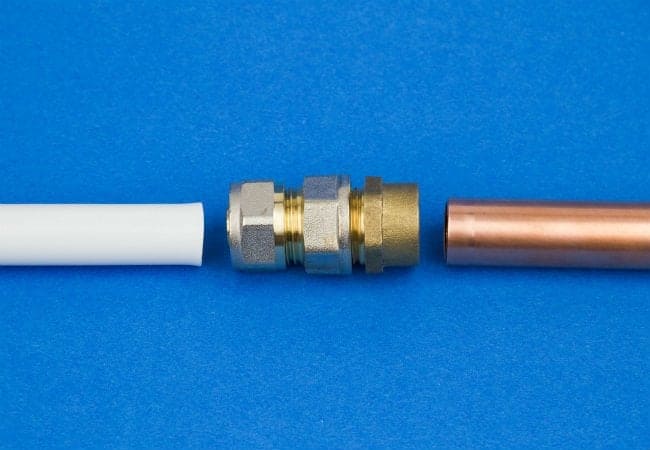
- You can also use screw-on adapters that have male or female fittings to connect copper pipes to PEX pipes.
- Female threads are on the inside of the adapter, and male threads are on the outside.
Conclusion
Connecting copper pipe to PEX pipe isn’t as difficult as it might seem, especially if you’re using a push-in adapter. In that case, all you have to do is to slide the pipes into the ends of the fitting, and that’s it.
If you’re going to use a solder-on fitting, you’ll have to:
- Apply flux on the outside of the copper pipe end, and on the inside of the fitting
- Insert the copper pipe into the fitting and heat up the joint with a blowtorch.
- Apply solder on the connection and heat it up with a blowtorch until it melts and secures the connection
- Let it cool before using or installing
If you have any questions about connecting different types of pipes together, let us know in the comments!