Do you want a customized boom sprayer? Lawn sprayers come in different styles, but they all generally work the same way. Buying one can, however, set you back a couple of hundred dollars.
If you want to add certain features and save on costs, you can simply make your own sprayer. This article will teach you how to make a boom sprayer out of PVC pipe.
This DIY project is quick, fun, and satisfying for anyone who loves caring for their lawn. All you need is basic and easily accessible parts to build a customized boom sprayer that gets the job done.
So, let’s dive in and discover how to set up a homemade boom sprayer!
Things You Will Need to Make a Boom Sprayer Out of PVC
- Tank: The tank carries the liquid such as fertilizer or herbicide that you spray on your lawn.
- Pump: Choose the right pump for your lawn size and spraying needs.
- Battery: A battery provides a reliable power source to operate the lawn sprayer.
- Pressure relief valve: This valve controls the liquid’s pressure, ensuring even application.
- On-off valve: This valve controls when you start and stop spraying the liquid fertilizer or herbicide.
- Filter: The filter is positioned on the suction side of the pump to prevent the hose and sprays from clogging.
- PVC hose: The PVC hose transfers the liquid fertilizer or herbicide from the tank to the nozzle. You’ll need a 3/8” PVC hose suitable for the type of liquid you plan to use.
- Aluminum pipe: This makes up most of the boom as it supports the nozzle and PVC hose.
- Nozzles kit: This kit consists of parts such as the nozzles, nozzle bodies, and sprayer tips.
Step By Step Guide On How To Make A Boom Sprayer Out of PVC
Once you gather all the parts, follow these steps to make a boom sprayer.
Step 1: Mount the pump on the plastic tank.
Choose the right pump for your lawn spraying needs. For lawns of about two acres, you will need a 25 to 30-gallon tank and the standard 12-volt pump for the boom sprayer to work efficiently.
Choose where on the tank you want to place the pump and mark four drilling holes. Drill the holes, and position the pump to align with each hole on the tank.
Use screws to secure the pump, and remember to secure the screws with flush nuts from inside the tank.
Step 2: Install the pressure relief valve
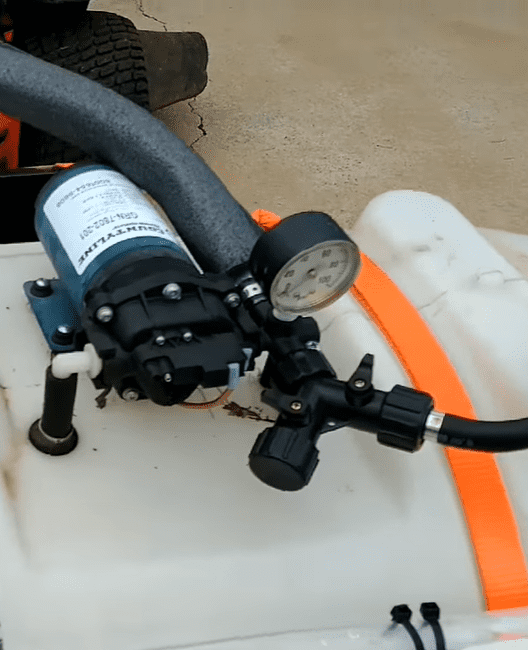
The pressure relief valve helps control the liquid’s pressure as you spray it across your lawn. It has an adjustable valve for setting the pressure and a gauge that gives you the pressure reading. The relief valve also has a bulkhead that directs extra liquid back to the tank.
To install the pressure relief valve, start by drilling a 7/8’’ hole atop the tank. Connect a burb fitting to the bulkhead and secure the barb threads with Teflon tape to prevent leakages.
Insert the bulkhead through the hole and secure it using screws and nuts. Next, use stainless steel clamps to attach a hose to the barb from inside the tank. This setup allows liquid to flow to the boom. The boom consists of a hose and an on/off valve.
Lastly, place a gauge atop the relief valve. The gauge should face you so you can monitor the pressure while using the lawn sprayer.
Step 3: Install the inline filter
The inline filter strains out particles and debris that can potentially block the spray tips. These particles could also swim down and interfere with the pump’s performance.
Drill a 7/8’’ hole on the tank just right close to the pump. Before installing the filter, apply Teflon tape to the threads to minimize leakages.
Insert into the tank the end of the filter that will attach to a feeder tube. You will then connect a 3/8” PVC pipe on the end of the filter inside the tank and secure it with hose clamps. The inline filter setup will serve as a feeder for the liquid spray.
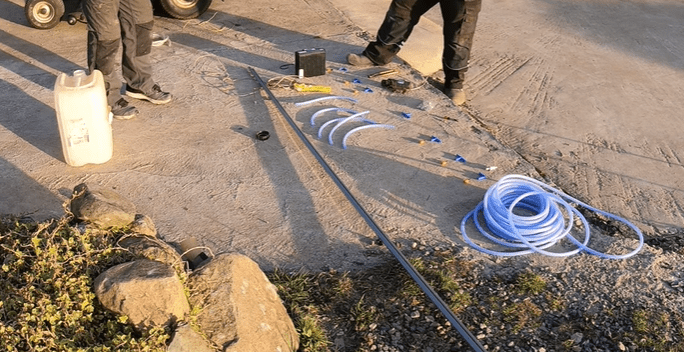
Step 4: Build the boom
Once you have all the other parts, it is time to build the boom. For this part of the project, you will need a PVC hose, aluminum pipe, boom sprayer nozzle kit, and stainless steel clamps.
Cut five equal pieces of the PVC hose. Take note of the length of the nozzle body; the pieces of PVC pipe should be the same length.
Next, connect spray tips to one end of the nozzle body. I recommend installing five nozzle body-spray tip connections for efficient spraying over a wider area.
Once you have connected the spray tips to the five nozzle bodies, it is time to secure the nozzle body to the aluminum pipe. The aluminum pipe supports the hose setup that ejects the liquid spray.
Use zip ties to secure the aluminum pipe’s five nozzle body. Space out the five nozzle body equally along the pipe.
Next, you now want to interconnect the five pieces of hose. The nozzle body will act as the connector between each piece of hose.
Insert the first nozzle body into one end of one of the five pieces of hose. Insert the other end of the nozzle body into the next piece of pipe until all the five pieces of hose are interconnected to form one long hose with nozzle body and their respective sprayers. Use stainless steel hose clamps to secure the connections between the hoses.
By following these simple steps, you now have a DIY boom sprayer.
Step 5: Position the tank on a pull-behind cart
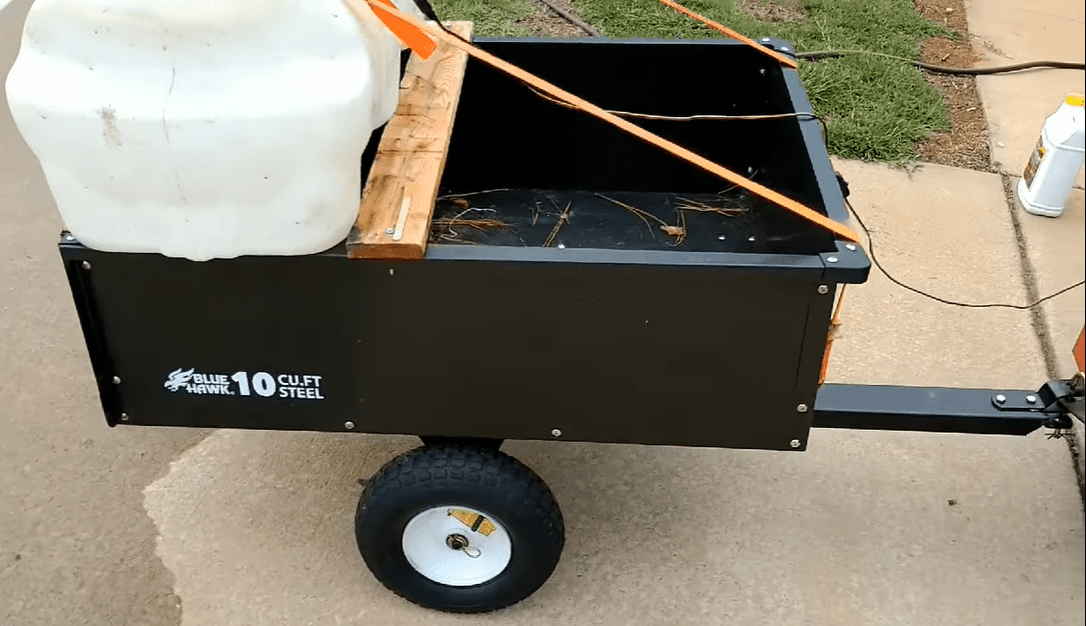
Now that you have set up the tank, filter, pump, valve, and boom, the next step is placing the tank and sprayer onto a cart. A cart makes it easy to hang the sprayer onto a lawn mower.
Lift the tank and place it on the respective cart. Check if you need to adjust the height of the tank to ensure that the sprayer is mounted from the right position to enable spraying over a wider coverage.
If you need to raise the tank, drill four holes, two on each side of the cart. Then, insert two small metal bars through the holes on each side of the cart to raise the tank as needed.
Position an aluminum frame around the cart to support where to place the boom. Next, mount the boom onto the aluminum frame and secure it to the cart using nuts and screws.
Step 6: Connect all the parts
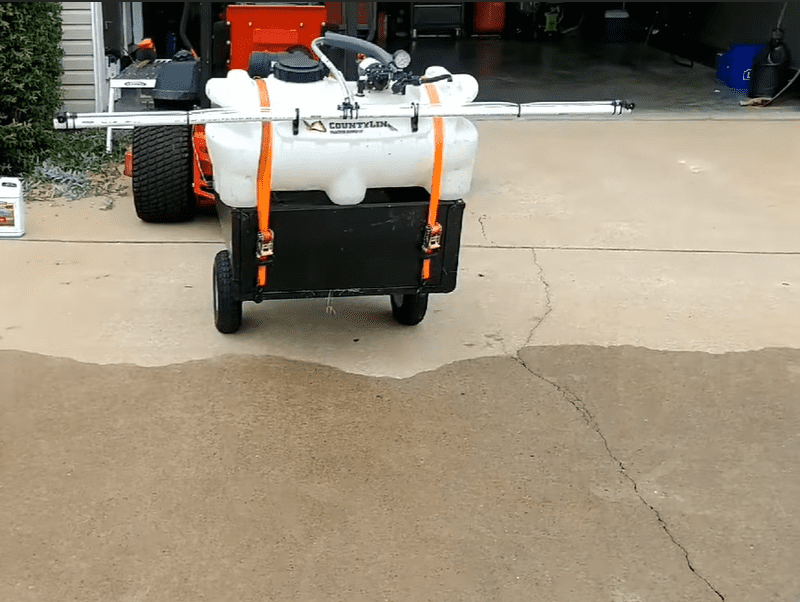
You are now halfway through the project. You have the pump, filter, valve, and boom in place, and the tank is mounted onto the cart.
All these components must work together for a high-efficient, customized lawn sprayer. Start by connecting the strainer with the pump. Attach a PVC hose to one end of the filter, then attach the other end of the hose to the pump.
Next, connect the pressure relief valve with one end of the pump. Attach one end of the hose pipe to the pump and the other end to the pressure relief valve to form a circuit.
Lastly, link the DIY boom sprayer with the pressure relief valve. I recommend making this connection using a spreader up; a spreader up is easy to use, allowing you to detach the boom from the sprayer setup quickly.
Step 7: Link the battery with the pump

Your homemade boom sprayer requires a power supply before using the appliance to spread fungicide, herbicide, and fertilizer to your lawn. Opt for a battery compatible with the pump power.
Remember, the pump you install will depend on your needs, for example, the size of your lawn. A larger lawn will require a pump with greater output, while a smaller pump will work just fine for a small lawn.
Connect the battery with the pump by first securing the battery on the cart’s aluminum frame. Link the battery to the pump and complete the setup by including a switch. The switch will be handy in turning the pump on and off as needed.
There you have it! Your customized boom sprayer.
Summary: How To Make A boom Sprayer Out of PVC
Boom sprayers have several advantages over boomless sprayers. For one, the boom sprayer itself points down to the ground, ensuring most of the chemical goes to the grass, and less of it is blown away by the wind. This makes boom sprayers the perfect choice for larger lawns.
The better coverage that a boom offers allows you to keep track of the areas you have sprayed and those that still need to be sprayed. Additionally, the nozzles on the PVC pipe are evenly placed, minimizing application overlap and saving time and money.
If you want to save on the cost of buying a new lawn sprayer, you should learn how to make a boom sprayer out of PVC. This project accords you all the great benefits of a store-bought boom sprayer at a fraction of the cost, not to mention it is super fun!
I hope this article has shown you how easy it is to make a boom sprayer out of PVC. Go ahead and try it for yourself.